Difficulty:
HARD
Sweet bag to for kids to keep their belonging while going to school.
Materials:
1) sewing machine
2) scissors
3) string
4) needle
5) button
6) measurement tape
7) brush
8) acrylic paint
9) Pattern cloth 120mm x 100mm x 1pcs
10) Pattern cloth 200mm x 150mm x 1 pcs
11) Pattern cloth in triangle 140mm x 100mm x 100mm x 1pcs
12) color cloth 200mm x 150mm x 1pcs
13) color cloth 130mm x 90mm x 1pcs
14) white cloth 120mm x 100mm x 1pcs
15) white cloth 190mm 140mm 1pcs
16) white cloth in triangle 140mm x 100mm x 100mm x 1pcs
17) felt 190mm x 140mm 2 pcs
How to make it:
1) Prepare white color cloth in size 120mm x 100mm.
 |
| Part A-back | | | |
 |
| Part A-front |
2) Sew the side as picture shown above.
 |
| Part B- length dimension |
 |
| Part B-Width dimension |
3) Prepare pattern cloth (follow own favorite pattern) in size of 120mm x 100mm.
4) Fold about 10mm of Part B as picture shown above.
5) Join
Part A and
Part B together as picture shown above. Lets state the joint part as
Part C.
 |
| Part C-front |
 |
| Part C-back |
6) Pictures shown above is the front and back for Part C.
 |
| Part D-side dimension |
 |
| Part D-top dimension |
7) Prepare white cloth in triangle with size 140mm x 100mm x 100mm.
 |
| Part D-back |
 |
| Part D-front |
8) Sew the side as picture shown above.
 |
| Part E-top dimension |
 |
| Part E-side dimension |
9) Prepare pattern cloth(follow own favorite pattern) in triangle with size 140mm x 100mm x
100mm.
 |
| Part F-front |
 |
| Part F-back |
10) Join
Part D and
Part E together as picture shown above. Lets state the joint part as
Part F.
Part F had shown at picture above
.
 |
| Part F-back |
 |
| Part F-front |
11) Use needle to sew the triangle edge as pictures shown above.
 |
| Part F |
 |
| Part C |
12) Sew the button at Part F (Back) and Part C (Front).
 |
| Part G-top dimension |
 |
| Part G-side dimension |
13) Prepare color cloth(follow own favorite color) with size 200mm x 150mm.
 |
| Part H-side dimension |
 |
| Part H-top dimension |
14) Prepare felt with size 200mm x 150mm.
 |
| Part I-front |
 |
| Part I-back |
15) Join
Part G and
Part H together as picture shown above follow the strait pattern. Lets state
the joint part as
Part I.

 |
| Part J |
16) Join
Part C, Part F and
Part I together as picture show. Lets state it as
Part J.
 |
| Part K-back |
 |
| Part K-front |
17) Prepare white cloth with size 190mm x 140mm
 |
| Part L-top dimension |
 |
| Part L-side dimension |
18) Prepare color cloth with size 130mm x 90mm.
 |
| Part L |
19) Sew the side of
Part L as shown at picture above.
 |
| Part M |
20) Join
Part K and
Part L together as picture show. Lets state it as
Part M.
 |
| Part N-top dimension |
 |
| Part N-side dimension |
21) Prepare pattern cloth (follow own favorite pattern) in size of 200mm x 150mm.
 |
| Part O |
22) Repeat step no.14 & 15.
Part O should be able to get after these 2 step.
 |
| Part P |
23) Use any type of cloth or other material as the belt (
Part P) of the bag.
24) Repeat step no. 17 and join together with the back side of the zip.
25) Join
Part M follow the orientation in the picture shown above.
26) Then, turn to another side, join
Part O on the zip. Make sure that the
Part O is on top of the
back side of
Part M
27) Now, join
Part J on the another side.
28) Turn
Part J facing with
Part O then
Part M facing
Part K. Join
Part J and
Part M.
29) Remember to sew in
Part P while sewing
Part J and
Part O.
30) Slot
Part P inside and sew "close"
Part J and
Part O.
31) Now join side of
Part M and
Part K.
 |
| front |
 |
| back |
32) fold over the bag as the 4 pictures shown above
33) sew close the top of joint from
Part K and
Part M.
34) Slot in the joint part into the bag as inner and the sewing part of the bag is done!
Lastly draw the favorite drawing on the bag using acrylic paint!


 25) Join Part M follow the orientation in the picture shown above.
  26) Then, turn to another side, join Part O on the zip. Make sure that the Part O is on top of the
 27) Now, join Part J on the another side.
  28) Turn Part J facing with Part O then Part M facing Part K. Join Part J and Part M.
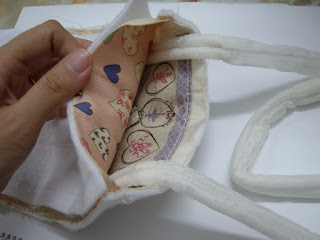
 29) Remember to sew in Part P while sewing Part J and Part O.
 30) Slot Part P inside and sew "close" Part J and Part O.
  31) Now join side of Part M and Part K.

 33) sew close the top of joint from Part K and Part M.


No comments:
Post a Comment